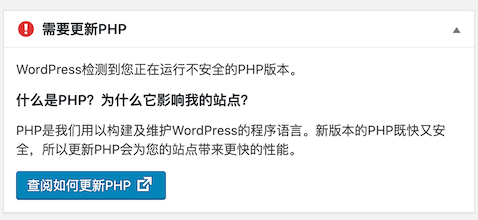
WordPress提示说当前使用的php版本不安全,升级以后更安全性能更好,那就升级一下吧!
- 首先:
yum clean all
yum update
no Pain no Gain no Gavin
WordPress提示说当前使用的php版本不安全,升级以后更安全性能更好,那就升级一下吧!
yum clean all
yum update
本人在国内最早的博客网站bokee.com有过一段时间的日志记录,现在看来虽然没有什么特别的用处,也是一些回忆和纪念,因此决定批量导入到本站。

采用的是Yii2框架结合”PHP Simple HTML DOM Parser”,其地址为:http://sourceforge.net/projects/simplehtmldom/,我用的是它的yii2插件版本keltstr\simplehtmldom。但是由于年久失修,已经不兼容php7+语法,因此,我自己做了一个升级版本,放在我的github上,github地址:https://github.com/deaboway/yii2-simplehtmldom
配置比较低的虚拟主机,不管是搭在CentOS还是Ubuntu上,Wordpress都会定期出现“建立数据库连接时错误”,那是因为PHP-FPM子进程过多,吃光了内存,MySQL的进程就被干掉了。
通过 netstat -tunlp 发现是MySQL的进程被干掉了,如果service mysqld restart 还重启不了,简单粗暴点就直接reboot。
解决方案
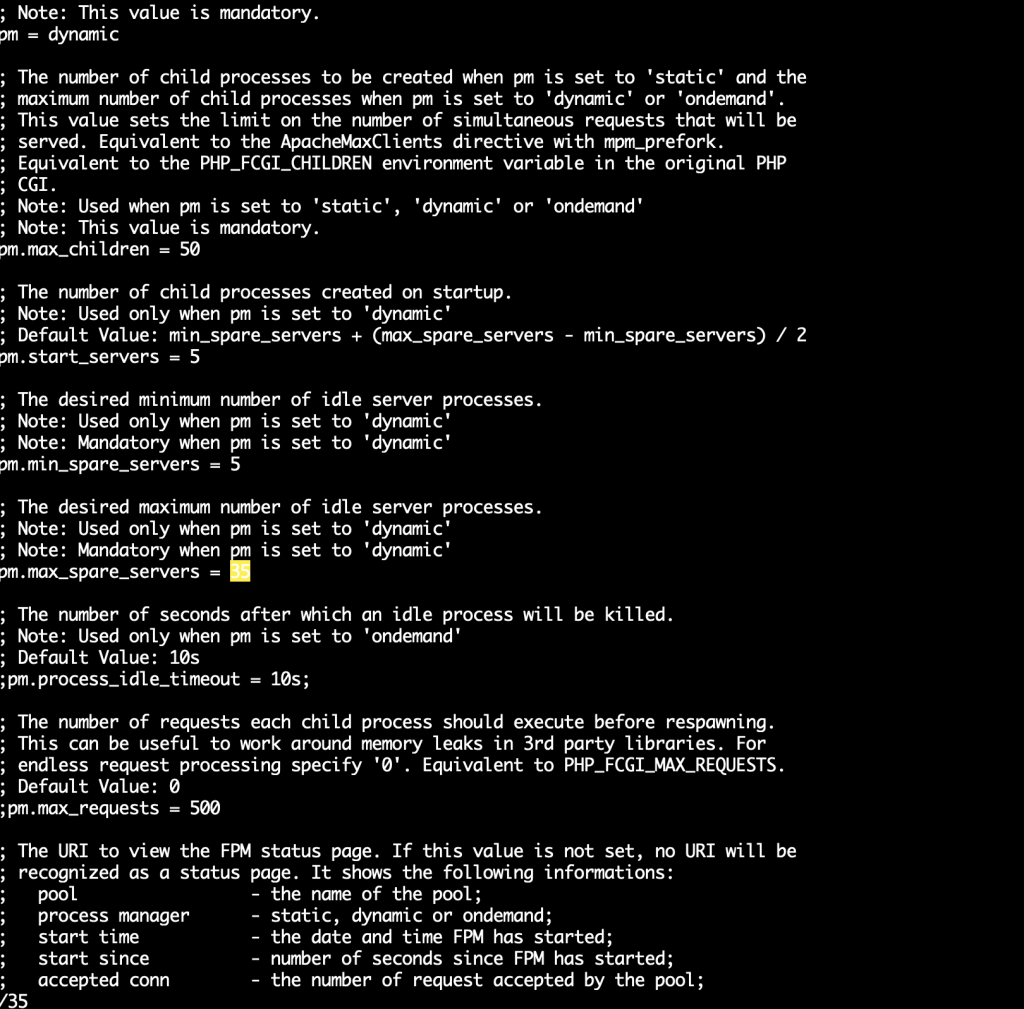
编辑 php-fpm.conf 文件,控制PHP-FPM的子进程数。
1、找到php安装目录etc目录下的 php-fpm.conf 文件:
vim /etc/php-fpm.d/www.conf
2、找到 pm 、pm.start_servers 、pm.min_spare_servers 、pm.max_spare_servers 这几项参数,修改参数的值。pm = dynamic #php-fpm以动态模式运行,动态模式适合内存较小的服务器pm.start_servers = 3 #动态模式下,php-fpm的起始进程数pm.min_spare_servers = 3 #动态模式下,php-fpm的最小进程数pm.max_spare_servers = 10 #动态模式下,php-fpm的最大进程数
3、重启php-fpm
service php-fpm restart
参考:
https://www.centos.bz/2017/12/wordpress%E5%AE%9A%E6%9C%9F%E5%87%BA%E7%8E%B0%E5%BB%BA%E7%AB%8B%E6%95%B0%E6%8D%AE%E5%BA%93%E8%BF%9E%E6%8E%A5%E6%97%B6%E5%87%BA%E9%94%99%E9%97%AE%E9%A2%98%E7%9A%84%E8%A7%A3%E5%86%B3/
https://www.simcf.cc/4671.html
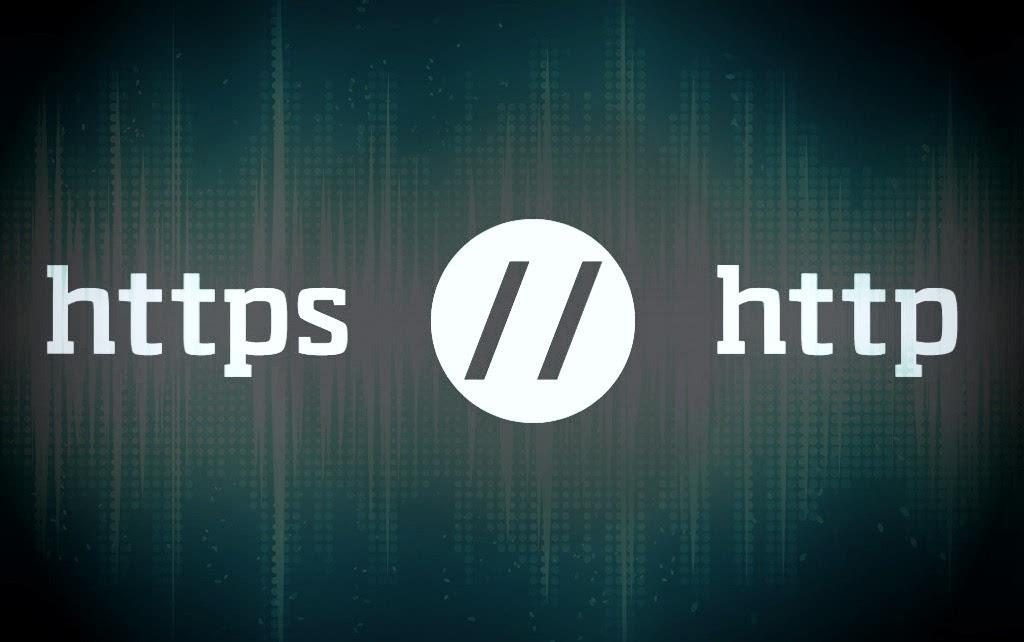
Mixed Content: The page at 'https://www.deaboway.com/' was loaded over HTTPS, but requested an insecure stylesheet 'http://www.deaboway.com/wp-content/cache/autoptimize/css/autoptimize_fabbbb6a8a981a178f0f8eeeb8cf4232.css'. This request has been blocked; the content must be served over HTTPS.
VM235:2 Mixed Content: The page at 'https://www.deaboway.com/' was loaded over HTTPS, but requested an insecure script 'http://www.deaboway.com/wp-includes/js/wp-emoji-release.min.js?ver=4.9.5'. This request has been blocked; the content must be served over HTTPS.
VM235:2 Mixed Content: The page at 'https://www.deaboway.com/' was loaded over HTTPS, but requested an insecure stylesheet 'http://www.deaboway.com/wp-includes/css/dashicons.min.css?ver=4.9.5'. This request has been blocked; the content must be served over HTTPS.
VM235:2 Mixed Content: The page at 'https://www.deaboway.com/' was loaded over HTTPS, but requested an insecure stylesheet 'http://www.deaboway.com/wp-includes/css/admin-bar.min.css?ver=4.9.5'. This request has been blocked; the content must be served over HTTPS.
VM234:1 Mixed Content: The page at 'https://www.deaboway.com/' was loaded over HTTPS, but requested an insecure script 'http://www.deaboway.com/wp-includes/js/jquery/jquery.js?ver=1.12.4'. This request has been blocked; the content must be served over HTTPS
//WordPress SSL
function deaboway_ssl(){
	if( is_ssl() ){
		function deaboway_ssl_main ($content){
			$siteurl = get_option('siteurl');
			$upload_dir = wp_upload_dir();
			$content = str_replace( 'http:'.strstr($siteurl, '//'), strstr($siteurl, '//'), $content);
			$content = str_replace( 'http:'.strstr($upload_dir['baseurl'], '//'), strstr($upload_dir['baseurl'], '//'), $content);
			return $content;
		}
		ob_start("deaboway_ssl_main");
	}
}
add_filter('get_header', 'deaboway_ssl');Crypto change setting
{
"Name": "SSL",
"Old value": "flexible",
"Type": "crypto",
"Value": "full",
"Zone name": "deaboway.com"
}1. CentOS 7 默认安装了sendmail,直接命令行可以运行。
which sendmail,如下:
/usr/sbin/sendmail
关闭IPV6(默认是开启的,IPV4和IPv6的地址不一样,关闭后记得检查IP地址)
sysctl -w net.ipv6.conf.all.disable_ipv6=1
sysctl -w net.ipv6.conf.default.disable_ipv6=1