1. node.js官网下载node安装
https://nodejs.org/en/download/
2. 确认安装成功及版本
node -v
npm -v
3. 安装truffle
npm install -g truffle
4. 安装testrpc
npm install -g ethereumjs-testrpc
5. 使用truffle可以很简单的创建项目
mkdir truffle-project
mkdir 001
truffle init
这个命令只会创建一个简单的项目,用于编写,编译,部署基于Solidity的智能合约,
如果需要创建基于Web应用的以太坊智能合约,则需要使用:
mkdir 002
truffle init webpack
Error: `truffle init` no longer accepts a project template name as an argument.
– For an empty project, use `truffle init` with no arguments
– Or, browse the Truffle Boxes at <http://truffleframework.com/boxes>!
参考http://truffleframework.com/boxes/webpack 进行后续操作咯,记得安装git和babel哟。
apt-get install git
npm install babel-preset-env –save
truffle unbox webpack
Downloading…
Unpacking…
Setting up…
Unbox successful. Sweet!
Commands:
Compile: truffle compile
Migrate: truffle migrate
Test contracts: truffle test
Run linter: npm run lint
Run dev server: npm run dev
Build for production: npm run build
6. 编译之
truffle compile
7. 部署/迁移
truffle migrate
记得打开testrpc,并且把vim truffle.js端口改成testrpc listening的端口
testrpc
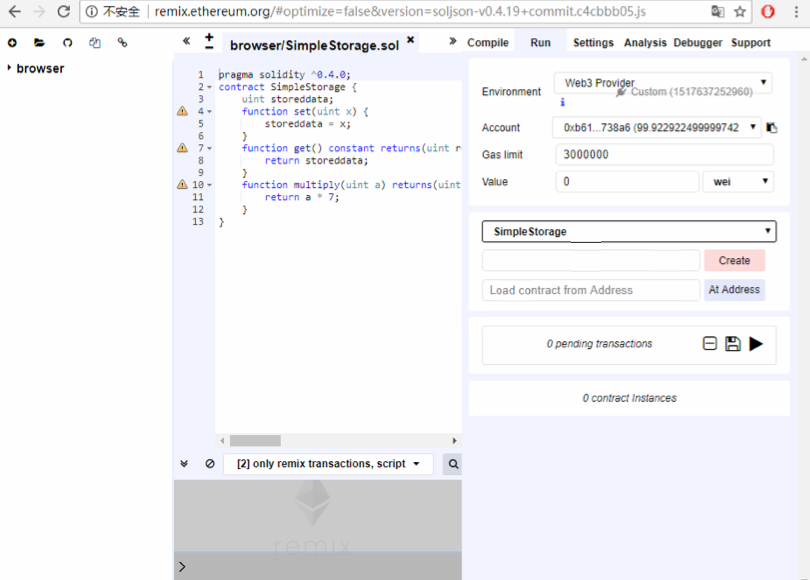
8. 官方推荐的Solidity基于浏览器端的Ide(Remix)
运行Remix有两种方式,一种是直接用浏览器打开网址: https://remix.ethereum.org/,还有一种是本地安装
> git clone https://github.com/ethereum/remix
> cd remix
> npm install
> npm start
Remix调试模式
第一种是默认模式:javascript vm
第二种,是通过本地私有网络的rpc端口,链接到本地私有网络进行调试
Plan A —— 未完全成功
进入上篇文章介绍的以太坊私有网络节点集,并使用我们讲过的方法启动节点:
cd ~/private_geth
节点1
geth –datadir ./data/00 –networkid 168 –ipcdisable –port 61910 –rpcport 8200 console
节点2
geth –datadir ./data/01 –networkid 168 –ipcdisable –port 61911 –rpcport 8101 –bootnodes “enode://248b019d6b5cd57fb6ba5628a683146127b40a457ab2b1fbbd5ed88d5b225cda7527bcb8b9e62de080ea0f4279bab11aa6d5324ff528d68620b63b2a173bdbbd@192.168.119.128:61910” console
我们按照官方提供的方法,增加几个选项,启动命令修改之后如下:
节点1
geth –datadir ./data/00 –networkid 168 –ipcdisable –port 61910 –rpc –rpcapi ‘web3,eth,net,debug’ –rpccorsdomain ‘*’ –rpcport 8200 console
节点2
geth –datadir ./data/01 –networkid 168 –port 61911 –rpc –rpcapi ‘web3,eth,net,debug’ –rpccorsdomain ‘*’ –rpcport 8101 –bootnodes “enode://248b019d6b5cd57fb6ba5628a683146127b40a457ab2b1fbbd5ed88d5b225cda7527bcb8b9e62de080ea0f4279bab11aa6d5324ff528d68620b63b2a173bdbbd@192.168.119.128:61910″ console
回到Remix浏览器Ide中,选中右侧边栏的’Contact’选项卡.在’Execution environment’选项中,选择:’web3 provider’, ide会弹出提示,让你输入之前我们启动的私有网络的rpc地址和端口, 输入:
http://192.168.119.128:8200
http://localhost:8101
http://127.0.0.1:8101
http://192.168.0.193:8101
Plan B —— 可以连接,同一网段不同服务器也可以连接
进入本篇文章的testrpc,Remix浏览器Ide中,选中右侧边栏的’Contact’选项卡.在’Execution environment’选项中,选择:’web3 provider’, ide会弹出提示,让你输入之前我们启动的私有网络的rpc地址和端口, 输入:
http://192.168.119.128:8545
注意:如果提示”Not possible to connect to the Web3 provider. Make sure the provider is running and a connection is open (via IPC or RPC).”
把remix改成http连接方式。http://remix.ethereum.org/ 因为:
https won’t let connect to testrpc running on http so run the IDE with http.
欢迎关注我的微信公众号:

如无特殊说明,文章均为本站原创,转载请注明出处!